
Best viewed in
Internet Explorer
PDF
Back to

Updated
06/21/2013 |
Modifying the
Chanter Reed
Altering reeds is a
controversial subject. Some pipers swear by barely touching their reeds
at all. Others have scraped so much that they could do it in their
sleep. Problem is, the reeds you get are sometimes going to require more
pressure than you can muster and are not always going to match the
characteristics of your chanter. Unless you want to just toss the reed
into the trash (which some pipers do), that's where sanding, scraping,
pinching, poking, squeezing comes in.
|
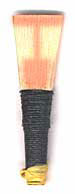
A
chanter reed's—for lack of a better term—"red zones." |
Altering reeds is a
controversial subject. Some pipers swear by barely touching
their reeds at all. Others have scraped so much that they
could do it in their sleep. Problem is, the reeds you get
are sometimes going to require more pressure than you can
muster and are not always going to match the characteristics
of your chanter. Unless you want to just toss the reed into
the trash (which some pipers do), that's where sanding,
scraping, pinching, poking, squeezing comes in.
Reed is too hard.
If a new reed is a "gut
buster" here are a few things you can do:
-
Play it until it softens up.
This can take weeks, but is the safest
method and leaves you with the strongest reed. Just plug
up the drones and play it as long as you can, it may
only be five or ten minutes. Over a week or two, when
comfortable, add a drone until you have your full set
going. If after a few weeks it's stopped getting easier
to play and it's still too hard, then think about taking
a more proactive step.
-
Hydrate the reed.
Dip it in water for a second or two, then shake it out
and dry it off, then play it. New reeds are usually
pretty dry and need moisture. (Unless you get a "Piper's
Pal" humidity control product for storage of new reeds.)
Avoid using saliva as it may contain microbes that will
begin to eat the reed—there are no enzymes in human
saliva that digest cellulose, it's only the microbes
we'd worry about. Don't soak a reed, it can
warp. You can repeat this, but less dramatic hydration
is better. Store the reed in a reed cap to keep it from
drying out too much, or ideally, use a Piper's Pal cap
to help regulate humidity.
-
Pinch it with your fingers.
This will temporarily ease a reed (and raise its pitch).
Try to keep pinching to the top third of the reed. If
you squeeze too low and too hard you will collapse the
sound box and destroy the reed. You can repeat pinching,
but again less is better. If you overdo it, a mandrel
may help open the reed back up.
-
Install a rubber band bridle.
Slide an orthodontics rubber band wrapped a few times
over the staple up past the hemping to a point about 1/5
of the way up the exposed cane of the reed. If this
makes it too easy, slide it down a bit. If it's still
too hard, scraping may be in order or move the bridle up
a bit—too high though, and the top hand will sound a
little thin. After a few weeks to months and the reed
eases, this bridle may be removed or gradually worked
down the reed as time goes on. If you wrap the rubber
band very tight or the reed is weak or you just want to
be safe, it'll be best to only slide the bridle up
during playing sessions, and to lower it back to the
supported staple area after.
-
Pinch the staple with pliers.
This is more drastic and usually unnecessary.
Needle-nose pliers either well wrapped in tape or
covered with leather works well. If you squeeze too
hard, but haven't damaged the blades, you can open the
staple back up with a mandrel. I’ve also “bitten” the
staple with my teeth, but a pair of pliers is easier to
control.
-
Sand/Scrape it.
This is irreversible. Removing part of the cane from the
reed cannot only reduce required pressure, but can also
have the unintended side-effect of changing the sound of
a reed. Dangerous "red zone" areas that typically affect
sound also are: the top strip of the reed, the sound
box, and the area down the center of the blades. (See
image above.) Where you scrape depends some on the
type and make of reed. A very drastic step is to carve
notches at both edges of the reed a bit above the hemp
line—only if you really have to, such as "the parade is
tomorrow!" On a ridge cut reed, you can scrape/sand down
a bit on the pronounced ridge itself. Don't take a brand
new reed and scrape it down to your usual comfortable
blowing pressure. Always leave "room" for the reed to
weaken. If you start at soft, it'll turn to mush later.
Reed is too soft.
If the reed shuts down easily with normal blowing pressure,
it probably won't last long and you should consider
discarding it. (Unless you are a hard blower, in which case
you can pass it along to another piper.) However, there are
a few options if for some reason you wish to chance it.
-
Pinch the edges of the reed to open its
mouth. You might have to do
this repeatedly.
-
Moisten then pinch the edges of
the reed to open its mouth.
You might have to do this repeatedly.
-
Use a mandrel to open up the staple and
force the mouth open. Just be
careful to keep the blade symmetrical—that is, the
blades should be an equal distance from an imaginary
center line across the length of the mouth.
- Cut off the tip
of the reed.
We're talking about a reed that's on it's deathbed
anyway (even if it's a new reed), so amputation may not
out of line as extreme as it is. This will also increase
the pitch and will most likely alter the relation of the
high notes to the low notes. Use a very sharp blade and
cut precisely even. Cut off small (0.5mm) amounts—as
long as you can keep it even—since you can't put it
back!
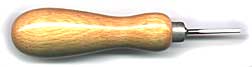 |
Mandrel.
While a mandrel looks like a small screwdriver,
it differs in that the end of the blade is a
quite rounded on the two sides. A cross section
of the end would reveal a stubby rectangle with
rounded corners though mandrels vary in shape
somewhat. |
Reed doesn't sound right.
Customizing chanter reeds for sound can be a bit of a
mystical art, sometimes shrouded in secrecy. Reeds are
by nature organic and therefore somewhat variable. To
further complicate the issue, reeds are made differently
by different makers as you would expect. What works for
some reeds can be a disaster for others. Adjusting the
high notes produced by a reed is the best understood,
but it's problematic trying to change the reed to affect
just a single note on the scale.
Here's a few
situations you might run into:
If the top
hand is too sharp,
you can sand/scrape off some off the top fifth (or so)
blades. Careful, you don't want to sand all the way
through the lips of the reed. An alternative to
modifying the reed is to tape the top of the chanter
holes to flatten notes that are too sharp.
If the top
hand is too flat,
the reed is too soft, see the remedies given above.
An alternative to modifying the reed is to sink the reed
farther into the chanter to sharpen notes that are too
flat.
If the
High-A is too sharp,
you can sand at the very tip of the reed. Again, you
don't want to sand all the way through the lips of the
reed. An alternative to modifying the reed is to tape
the top of the chanter hole to flatten the note that is
too sharp.
If the
High-A has too much "crow",
aside from just blowing through it (blowing harder) or
giving a new reed some time to break-in, you can sand at
the very tip of the reed as you would to flatten High-A.
Again, don't sand all the way through the lips of the
reed as this will actually make the blades shorter.
If the
High-G is too sharp,
gently sand about 1/16" down from the top of the reed.
F is
inconsistent or flat relative to other notes.
An inconsistent F is known as a "collapsing F" or as a
"double-toning F." The note varies wildly with small
changes in pressure. It is usually caused by three
things: the sound box being too open, the blades being a
little too long, or the reed being positioned
incorrectly in the chanter's reed seat.
-
For some very odd
reason, sometimes the F note can become flat when
the reed is pushed too far into the chanter.
I have yet to hear a good explanation for this
counter-intuitive phenomenon. If you are in a
non-band situation, try moving the reed out (or in)
to correct a problematic F.
-
Try gently pinching
the sound box, repeat as necessary.
-
The easily reversible
procedure to try is to tie hemp around the sound box
creating a bridle to apply a little pressure. You
can also try a small rubber band (such as used in
orthodontics) as a bridle around the sound box, but
since this applies more pressure, it would be wise
to roll this type of bridle down onto the binding
when you are done playing the reed, otherwise you
may gradually collapse the sound box.
-
The drastic option is
to cut a bit off the end of the reed, which will
also make the reed harder to blow. On the other
hand, you don't have to worry about bridles
shifting.
Unfortunately, there's no great substitute for
experience. The road to true mastery of reed scraping
and sanding will be littered with destroyed reeds. Just
go easy, start timid.
|
|